I have been asked in the past about the setup of bleeds & crop marks, so I thought I would try to explain this concept briefly. When any file is received by the printers it needs to have appropriate bleeds and crop marks set to ensure proper printing and cutting.
Bleed is the area where the artwork is extended to go beyond the actual size of the print, this extra space ensures that you do not get a white strip around the print in case it gets misaligned when cut. Crop marks are the small marks on the corners of the print to guide the printing company in aligning the machines for cutting.

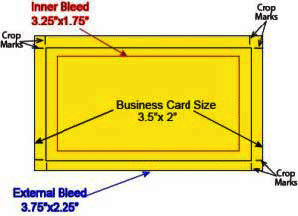
Generally when designing any kind of print material we need to consider three things, the actual print size, internal bleed and the actual bleed also called external bleed. To explain this better, lets take a look at the example of a business card, if you notice the external bleed is set a quarter inch bigger then the actual size of the card and subsequently the inner bleed is a quarter inch smaller then the actual size of the card,
.
Inner Bleed
When designing the artwork it is important to make sure that all writing and artwork stays inside the inner bleed. By doing so we can be confident that when the cards are cut none of the information we want will get cropped out. Normally quarter inch bleed i.e. 0.125 inch on each side of the print material is required by most printers and by setting up the artwork in this manner many mistakes can be avoided.
External Bleed
If an object reaches the edges of the document it should be extended into the bleed area, for example the background artwork or color on a business card should be extended to the external bleed and will ensure no white borders. again use, 0.25 inch bleed or 0.125 inch on each side.
Crop Marks
Crop marks are thin lines on the corners of the print document which show the end of the bleed lines and start of the actual document. These thin lines help the printers to align the printed sheets for trimming. Almost all the designing applications have an option that can be check marked to produce these trim marks.
The above mentioned guidelines if followed will hopefully help you achieve hassle free printing.
